
After I have the seat finished and sanded to 220 grit I will start the cutting process for the rockers and back braces. I don't like cutting thin strips. I don't know of many woodworkers who do. I see lots of discussions in the woodworking forums asking about how to do this safely and with little waste. I make my number one priority safety. Waste is what it is and unless you are in a large production shop I don't think spending a lot of time worrying about waste from the saw blade matters. The rockers are each made of eight (8) thin strips, laminated up in a form, clamped for 24 hrs and set aside. I only use one set of forms so I have to glue up the rockers in two steps. It's okay to glue up one rocker, the second rocker, and the back braces on different days as they will be assembled in the very end. I will cut all the strips at one time. Each strip for the rockers will be 1/8" x 1 1/2" x 48". You will need 8 strips per rocker and a few extras for the stacks at each leg connection to the rockers.
 The picture shows the different layers and the stack at the leg connection making up the rocker. Here I used a walnut strip as an accent. Each "stack" at the legs will be made of nine (9) pieces total about 10" long. I add the stacks to the rockers after I glue up the rockers. Set the stack pieces aside until the chair is ready to attach to the rockers. You will want to make sure the chair is perfectly balanced on the rockers first.
I made a jig for cutting the narrow strips. It isn't fancy but it works. 
 In the second picture you can see a strip that has been cut still along side the "push leg". The "push leg" as I call it is on the right side of the blade up against the fence. It is about 30" long. It could be made 48" long with a fixed stop block on the end. I will use this same jig when cutting the shorter strips for the back braces. The smaller push block on the left keeps slight pressure on the material as it passes thru the blade. I have an adjustable stop block on the end for different thicknesses of material I'm ripping. Something I noticed when posting these last pics is the saw blade guard plate. You should use a "0" clearance plate which is what is in the second pic. I changed to the 0 clearance plate before ripping the stock. This is very important. Don't try to rip narrow material without using the 0 clearance plate. You can make your own plate or buy a ready made. I know some who buy the hard plastic cutting boards at Home Depot and make them. I will be trying that next as I need to make some for different size dado cuts.

 In the second picture you can see a strip that has been cut still along side the "push leg". The "push leg" as I call it is on the right side of the blade up against the fence. It is about 30" long. It could be made 48" long with a fixed stop block on the end. I will use this same jig when cutting the shorter strips for the back braces. The smaller push block on the left keeps slight pressure on the material as it passes thru the blade. I have an adjustable stop block on the end for different thicknesses of material I'm ripping. Something I noticed when posting these last pics is the saw blade guard plate. You should use a "0" clearance plate which is what is in the second pic. I changed to the 0 clearance plate before ripping the stock. This is very important. Don't try to rip narrow material without using the 0 clearance plate. You can make your own plate or buy a ready made. I know some who buy the hard plastic cutting boards at Home Depot and make them. I will be trying that next as I need to make some for different size dado cuts.
 If you have the proper saw blade for ripping you won't need to use a jointer after each pass. I run the strips through my drum sander with 120 grit paper. My saw cuts a very clean edge so running it through my sander one pass takes care of any inconsistencies. Wow, that's a big word. Here you can see all the strips cut and ready for glue up. Notice the walnut middle strips in the center. I like to look all the pieces over and decide which ones will be on top as these will show the most. The others don't really matter. Now to get my rocker forms. If you are making the forms take your time. This is a critical form to make. The curvature needs to be correct for a smooth rocking motion. You want your chair to rock like it's on air and not over a bunch of marbles.
 Here you can see all the strips cut and ready for glue up. Notice the walnut middle strips in the center. I like to look all the pieces over and decide which ones will be on top as these will show the most. The others don't really matter. Now to get my rocker forms. If you are making the forms take your time. This is a critical form to make. The curvature needs to be correct for a smooth rocking motion. You want your chair to rock like it's on air and not over a bunch of marbles.
  Here you can see the eight (8) strips glued up and clamped in the 2 piece form. I use Saran wrap to keep my rockers from sticking to the forms. At some point I may add some metal strips to the form sides to eliminate using the plastic but that is for another day. I"ll set this form aside for 24 hours and start another process. Maybe the back legs. Need to get the templates out again.
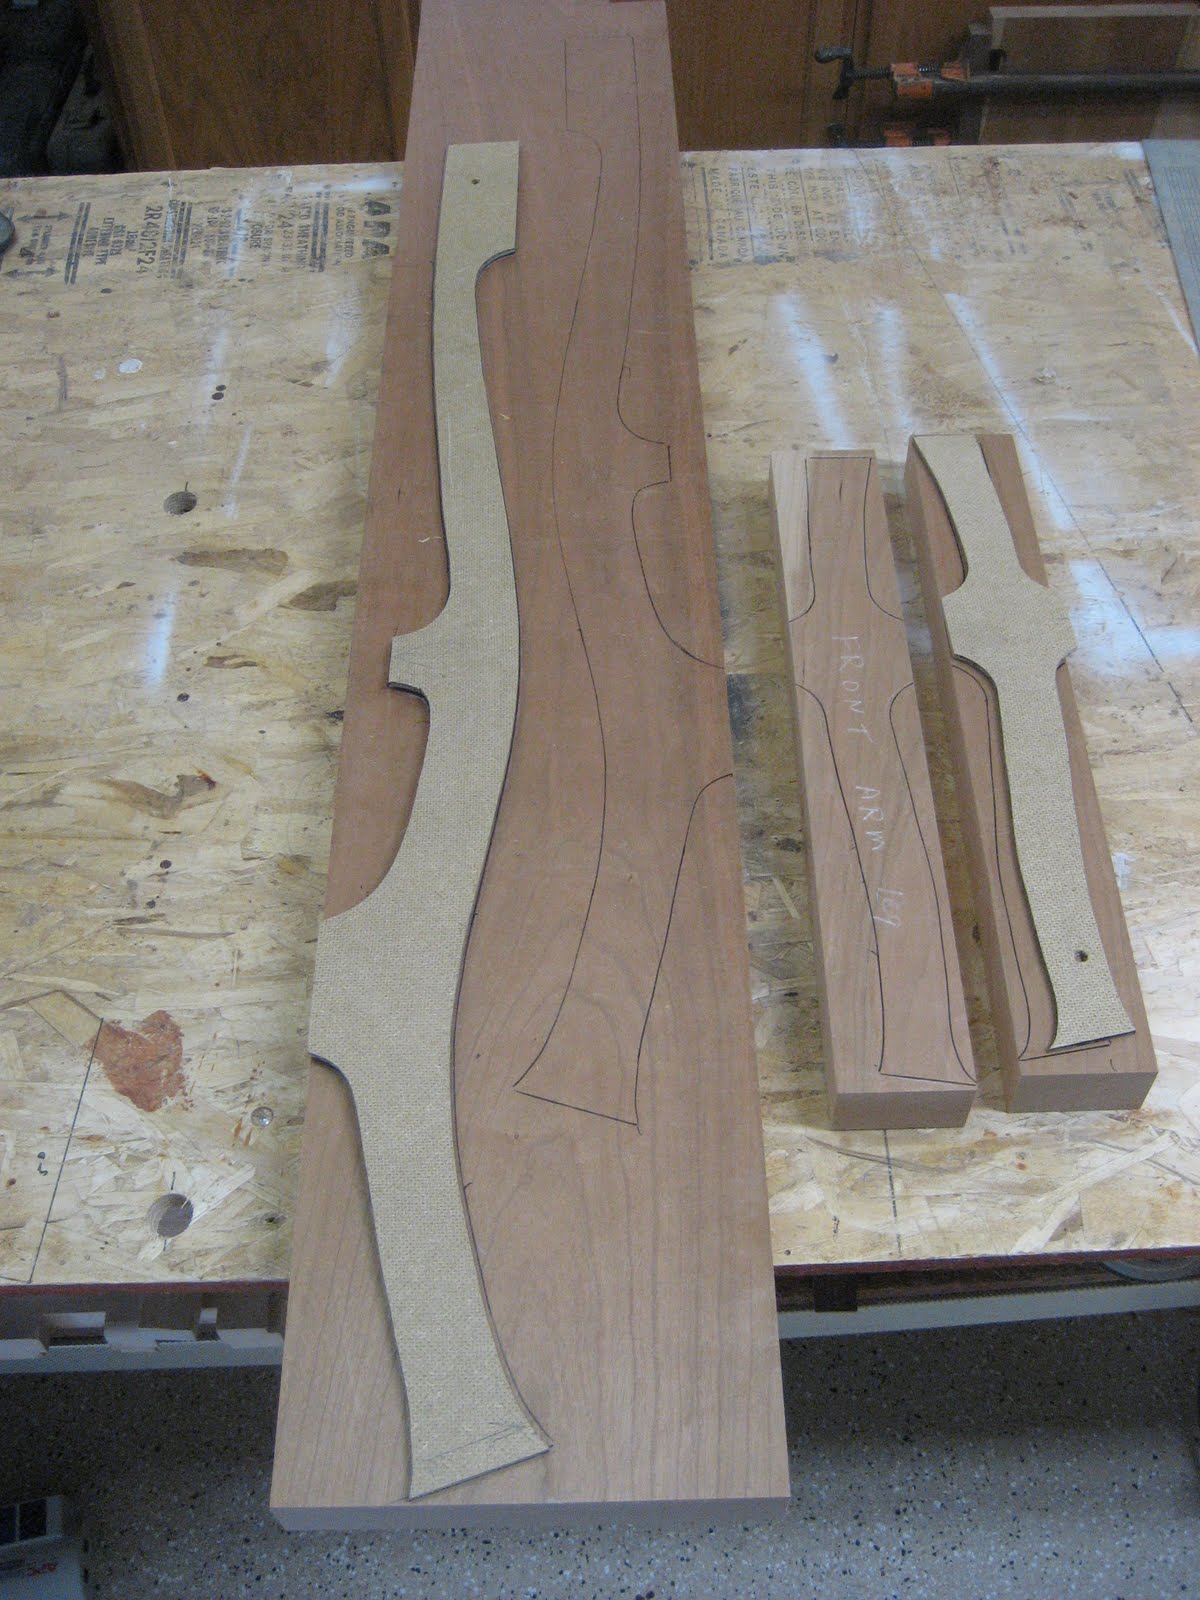 I have the templates for the rear and front legs on the material and checking for grain patterns. This is where you may get some waste as you look at the grain direction. Don't hesitate to use different pieces of material to get a better pattern or grain direction. The tendency is to not have any waste but again, I think it's more important to get the piece cut from the right section of material. I'm going to stop for today but before I do I want to post my writing desk that I have been busy working on. It has been selected for judging in the San Diego Design in Wood Competition. I'm very happy and excited about this.
 You can see more pictures on my new website.
www.mahoneywoodworks.com Notice the legs. Look familiar? I will make a swivel office chair to match next. I didn't have the time to get one built before the submittal deadline. I had the pictures of this desk taken by a very good professional photographer. You are only allowed to submit 2 pictures of your work so I thought I would spare no expense in getting my desk accepted. Not sure a chair would be accepted as the selection committee sees a lot of chairs. When I was designing this desk, I tried to keep in mind what Sam Maloof said he looked for when judging furniture pieces. He said he looked for good designs and it's just as important that the piece is functional. Why make a chair that looks good but is uncomfortable to sit in?