
I started on a Monday morning sitting in a chair with my drawing notebook, the same notebook I used when taking my first computer class back in 1984 (that is some interesting reading I might add), a small ruler and pencil with a good eraser. Now comes the hard part. Where to start. Well, I actually had the idea for the legs already. I hate to throw out any scraps of nice wood, especially walnut or cherry. I saved the cutoffs from the back legs of a chair because I couldn't throw them out. I was looking for some scrap one day and grabbed them from the bin and as I held them I had an inspiration. I was looking at an end set of legs for a desk.

These are the inside top cutoffs from the back legs of the rocker build. When the back legs are rough shaped I narrow the inside face about 5/8" in. I'll show that process in my next few posts when I get to the leg shaping. If you rotate the pic counter clockwise you will see what I saw at that time. So now I'm feeling like I have a start to a design that is keeping with the type of rocking chairs that I have made. So, here I sit withI my desk complete and ready to take to the photographer for some good pics. I plan on submitting this desk to a woodworking competition that will take place this coming July. Good pictures are important for showing your work to others that can't see first hand what you spent so much time on. The first thing I want to do when looking at what I think is a very nice piece of art or furniture is touch it. Feel the finish. Some woods just seem to come to life when all the finish has been applied. The grain and patterns that light can change will draw your eyes to differnt parts and areas for a closer look and feel. You can't get the same feeling when looking at a picture but a good picture helps in that it makes you want to see more. Keep checking back and in a month or so, I'll post what I hope will be a good picture of my desk. So where was I?.....................oh yah, the carving of the seat. Get ready to get very dusty. I would suggest you take your seat outdoors. I will be using my 4" grinder with a medium Kutzall disc. I have already maked out the seat area that will be shaped. The deepest section in the back will be 3/4" deep and end up 1/2" deep at the front of the chair. The shape will flair up in the center front. I have small 1/8' holes drilled into my template at 9 locations that will act as guides for my depths. I use these holes to drill 1/8" holes to the proper depth. Using a brad point bit will leave a small mark that final sanding will remove. I use my drill press to get the depths correctly drilled. Sam Maloof did this work using his bandsaw to remove a lot of waste prior to glueing up the pieces. I stand corrected again as I was correct in my previous post in that he used a total of 5 pieces for his seats. 4 or 5 doesn't really matter for me. I think if you are just starting a chair for the first time maybe 4 pieces without bevels would be easier to master. By that I mean the seat blank will be flat. With Sam's chairs the pieces were beveled on the sides which saved him some grinding work when shaping the seat bottom. You still have to shape the top either way.
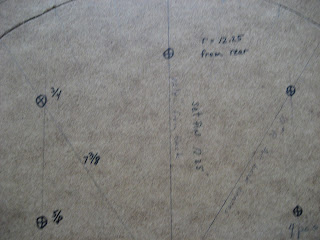
 I think one thing to keep in mind is that this is a chair I am building and I am free to make any changes I want unless you have a client that has very specific dimensions. I am very inspired by Maloof's work but also want to make it my work. So, If your seat profile isn't exactly like mine or his that's not a bad thing. These are dimensions that work for me. When I get to the actual grinding it may change because of an "oops". Went to far! Now what? Don't panic just adjust the matching side or area and keep going. Grab some cheap pine boards to practice and you will find it's not as hard as it first looks. It still is dusty. Wear a good mask and put on the eye protection. Word of caution, the Kutzall disc will take away skin very quickly. Be mindful of setting down the grinder. Wait until the motor stops. I will take a folding work table outside and clamp the seat to it. Warn the neighbors and fire department first and keep the kids back. You will find that once you start shaping, the grain pattern may change and expose some interesting patterns. You may also encounter some insect holes, knots or other imperfections. Not to worry as it's wood.
 I would suggest you take your seat outdoors. I will be using my 4" grinder with a medium Kutzall disc. I have already maked out the seat area that will be shaped. The deepest section in the back will be 3/4" deep and end up 1/2" deep at the front of the chair. The shape will flair up in the center front. I have small 1/8' holes drilled into my template at 9 locations that will act as guides for my depths. I use these holes to drill 1/8" holes to the proper depth. Using a brad point bit will leave a small mark that final sanding will remove. I use my drill press to get the depths correctly drilled. Sam Maloof did this work using his bandsaw to remove a lot of waste prior to glueing up the pieces. I stand corrected again as I was correct in my previous post in that he used a total of 5 pieces for his seats. 4 or 5 doesn't really matter for me. I think if you are just starting a chair for the first time maybe 4 pieces without bevels would be easier to master. By that I mean the seat blank will be flat. With Sam's chairs the pieces were beveled on the sides which saved him some grinding work when shaping the seat bottom. You still have to shape the top either way.
 I think one thing to keep in mind is that this is a chair I am building and I am free to make any changes I want unless you have a client that has very specific dimensions. I am very inspired by Maloof's work but also want to make it my work. So, If your seat profile isn't exactly like mine or his that's not a bad thing. These are dimensions that work for me. When I get to the actual grinding it may change because of an "oops". Went to far! Now what? Don't panic just adjust the matching side or area and keep going. Grab some cheap pine boards to practice and you will find it's not as hard as it first looks. It still is dusty. Wear a good mask and put on the eye protection. Word of caution, the Kutzall disc will take away skin very quickly. Be mindful of setting down the grinder. Wait until the motor stops. I will take a folding work table outside and clamp the seat to it. Warn the neighbors and fire department first and keep the kids back. You will find that once you start shaping, the grain pattern may change and expose some interesting patterns. You may also encounter some insect holes, knots or other imperfections. Not to worry as it's wood.
I like to start on the back deepest areas and work my way forward. Picture yourself sitting in wet cement and waiting until it hardens. The impression you would make is what we are trying to achieve. I actually thought about doing something similiar to that with drywall compound and making a mold to look at. After doing a few chairs you kind of get the hang of it. Or, you could get one of those expensive CNC machines that can make thousands of the same piece. Yuk, how boring is that. After you get most of the waste removed you can sit in the seat and feel where you need to shape. This is the very high tech sander that I use after I get finished with the rough grinding process. It's a 6" grinding pad with a 5/8" bolt for a handle. I will use 60 grit paper to start, then 80 and all the way up to 220 grit and then stop. I want to fit the legs and cut the side and back profiles before finish sanding. I know that when dry fitting the legs and shaping the legs to the seat will make some scratches so I wait until the legs have been shaped and glued to the seat before final sanding.
 In this picture you can see how the front seat area rises up to a dull point in the center. When you get to this point in the shaping, hopefully you didn't run into your seat dowels or biscuits used to join the seat blanks. Not sure I mentioned this earlier in another post. That would be an important tip. Make sure your dowels or biscuits are low enough so that you won't expose them during the seat shaping. You can also see the sapwood high lighted in the center. This worked well for this chair.
 This is the very high tech sander that I use after I get finished with the rough grinding process. It's a 6" grinding pad with a 5/8" bolt for a handle. I will use 60 grit paper to start, then 80 and all the way up to 220 grit and then stop. I want to fit the legs and cut the side and back profiles before finish sanding. I know that when dry fitting the legs and shaping the legs to the seat will make some scratches so I wait until the legs have been shaped and glued to the seat before final sanding.
 In this picture you can see how the front seat area rises up to a dull point in the center. When you get to this point in the shaping, hopefully you didn't run into your seat dowels or biscuits used to join the seat blanks. Not sure I mentioned this earlier in another post. That would be an important tip. Make sure your dowels or biscuits are low enough so that you won't expose them during the seat shaping. You can also see the sapwood high lighted in the center. This worked well for this chair.
No comments:
Post a Comment